ClassicUO
ClassicUO
These are some basic tips and troubleshooting steps for ClassicUO. For a comprehensive guide to Razor, go to the Razor help site.
Copying/Cloning Profiles
If you have a specific setup on a character that you'd like to replicate across multiple characters, follow these step:
- Completely close out of ClassicUO & Razor
- Locate the ClassicUO profile of the character you want to copy
Tip
If you're using the default installation location, replace ACCOUNT_NAME and CHARACTER_NAME with your information and use the path below
C:\UORenaissance\ClassicUO\Data\Profiles\ACCOUNT_NAME\UO Renaissance\CHARACTER_NAME
- Copy all the files from within that folder into the folder of the other character you want to have this profile
- Open ClassicUO and login back in to confirm the profile works.
Warning
You can't import your desktop/profiles from the OSI client into ClassicUO. You must create a new profile within ClassicUO.
Counter Bars
While you can still have counters in your game's titlebar, ClassicUO doesn't support images. It is recommended that you use the built in counter bar.
- From your paperdoll, click Options
- Select Counters and enable
- Set the number of rolls and columns
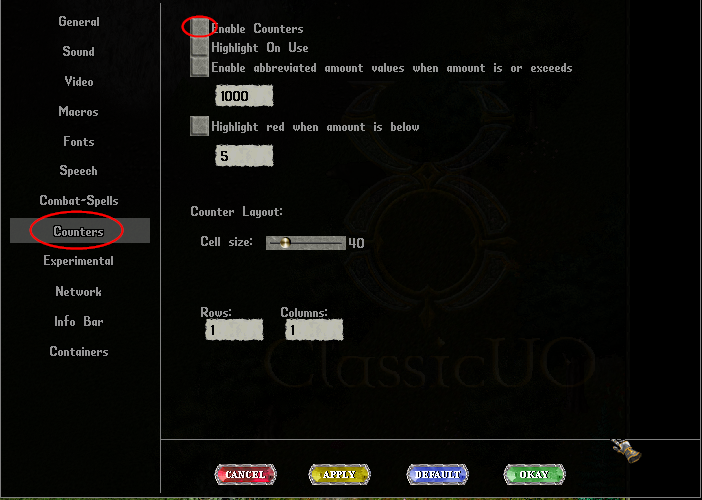
To add items to your counter bar, simply drag them into an empty slot.
Razor Macro Buttons
If you want to call a Razor macro but don't want to tie it to a hotkey, you can create a simple macro button.
- From your paperdoll, click Options
- Go to Macros and create a new one.
- Click
+Create macro buttonand place it on your screen - From the dropdown, select
Sayand enter>macro nameofmacroor selectRazorMacroand typenameofmacro
Tip
RazorMacro simply appends >macro instead of you having to include it. You can use either.
World Map
ClassicUO with the UO:Renaissance Launcher has a built in World Map with several map markers to help navigate through Britannia.
Open World Map
Simply click on the World Map option in the menu to open it map.

Right-click on the map to open up the option menu.

Markers
Atlas: Locations such as landmarksCommon: Locations such as towns, shop names, dungeon entrancesDungeons: Locations within dungeons, such as specific room names or the dungeon level changesTreasure: All the numbered treasure map spots found throughout BritannaUORGeoSurvey: UO:Renaissance Geological SurveyUOROakMap: UO:Renaissance Oak Map
Geological Survey & Oak Maps
These map points are included but not enabled by default as they aren't used by everyone.
To enable these on the World Map, follow these steps:
- Go to
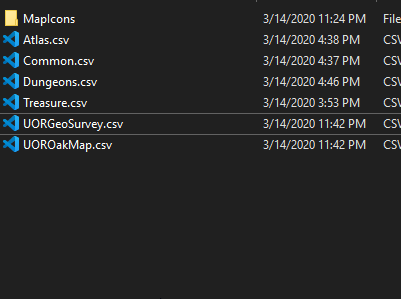
C:\UORenaissance\ClassicUO\Data\Clientand rename the filesUORGeoSurveyandUOROakMapfrom.csv.xto.csv - Right-click on the World Map, click Map Marker Options and click Reload Markers or close and re-open the World Map.
Create/Edit Map Markers
All markers are stored in C:\UORenaissance\ClassicUO\Data\Client using a simple .csv format that can be opened with any text editor or spreadsheet applications such as Excel.
Creating your own marker file is simple. Create an empty file and enter it using this format:
x,y,mapindex,name of marker,iconname,color,zoom level
xandyare the coordinates for the marker.- The
mapindexdefines what map the client must be on for the marker to display.0formap0.mul,1formap1.mul, etc. - The
name of markeris just that, the name you want to see in the map or when you hover over the marker. - The
iconnamemust match the name of the image in theC:\UORenaissance\ClassicUO\Data\Client\MapIconsfolder. If no icon exists, it will display a simple dot using the color defined. Icons can be created as.cur,.png,.jpg,.icofiles. - For
color, the supported values arered, green, blue, purple, black, yellow, white, none. zoom leveldefines when the icon will show/hide when zooming.0 = furthestand9 = closestso if you had a marker zoom level set to 1 (for example dungeon entrances), it will show at any zoom level except if you're all the way out (at 0). Default level is 3.
Contribute
The latest markers & icons included with the UO:R Launcher are available here.
UOAM Support
Warning
UOAM has long been abandoned and the developer has made it clear that he won't be sharing the code so UOAM will only work if it detects the standard OSI client running, which enables the UOAssist API support of UOAM.
This method should work, but for some it may not.
If you don't have UOAM installed, you can download it here.
To use UOAM with ClassicUO, do the following:
- Open the standard OSI client (with or without Razor) and leave it minimized. You don't have to log in.
- Open ClassicUO with Razor
- Open the UOAM (Locked) shortcut and as long as you leave the standard OSI client open, it will track in ClassicUO perfectly.
If the location is wrong in UOAM (or not tracking at all), follow these steps:
- Go buy a sextant in game and use it
- In UOAM, click UO->Calibrate
- Enter your map, longitude and latitude and click OK